Windows Password Geeker Advanced is powerful that it can easily reset all versions of windows user accounts' password with CD, DVD and/or USB Flash Drive, such as Windows 10/8/7/Vista/XP local administrator/other user password and Windows server 2000, 2003, 2008, 2011, 2012 local and domain administrator/user password.
This tutorial will show you how to use "Windows Password Geeker Advanced" to reset your Windows 10, 8, 7, Vista, XP password and Windows Server 2012, 2011, 2008, 2003, 2000 local and domain password easily with CD/DVD or USB step by step. We highly recommend you to use a USB Flash Drive because of its small size and simple usage.
Step 1: Download and install Windows Password Geeker Advanced on anther computer you can login as administrator.
How to get "Windows Password Geeker Advanced"?
You can download the full version after purchasing Windows Password Geeker Advanced, and then install it on Windows 10, 8, 7, Vista, XP, 2012, 2008, 2003, 2000.
After you click Buy Now button on our website, it will navegate you to another order platform, Swreg/Regnow, which is one of the most popular e-commerce platform of world. You will receive a e-mail with download link in it when you successfully process the purchasing. The procedure is easy and secure.
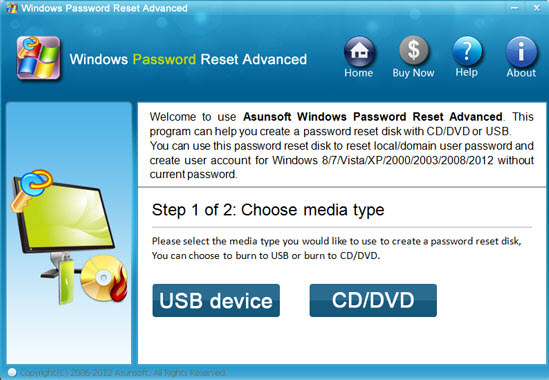
Step 2: Run the software to create a password recovery disk with CD/DVD or USB.
Note: You have to do this on another computer.
Option 1: Create a Windows server password recovery disk with USB.
1. Plug in a writable USB Flash Drive and choose USB Device.
2. In second step, select you drive name from the pull-down list. Click Begin Burning button, the burning process will start.
3. Burning completed successfully, take out you USB Flash Drive.
Option 1: Create a password recovery disk with CD/DVD.
1. Plug in a writable CD/DVD and choose CD/DVD.
2. Select you drive name from the pull-down list. Click Begin Burning button, the burning process will start.
3. Burning completed successfully, take out you CD/DVD.
Step 3: Plug in the newly recovery disk to your locked computer, boot the computer from CD/DVD or USB.
Start your locked computer (Windows 10, 8, 7, Vista, XP, 2012, 2011, 2008, 2003, 2000 local user) or the server computer (Windows server 2012/2012/2008/2003/2000 domain user) and press BIOS entry key as soon as possible to get into the BIOS SETUP table, change the devices boot order, After you saving the change, your computer will restart automatically and boot from your recovery disk.
 I created a recovery disk with CD/DVD
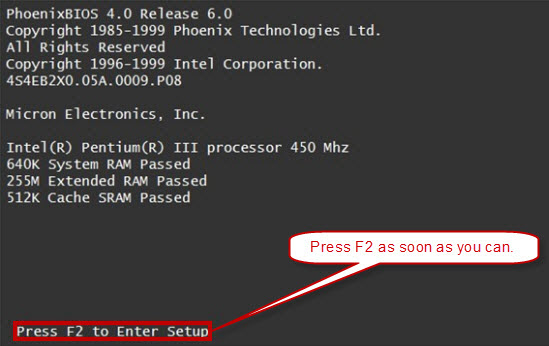
1. Insert your CD/DVD Recovery Disk. Start/Restart your computer and press F2/DELETE (How to Enter Your BIOS SETUP via BIOS Key) immediately and repeatedly until the SETUP table pops up.
2. BIOS(COMS) setup main menu appears, now you can use up/down key to choose BIOS FETURES SETUP. Hit Enter key to enter BIOS FEATURES SETUP table.
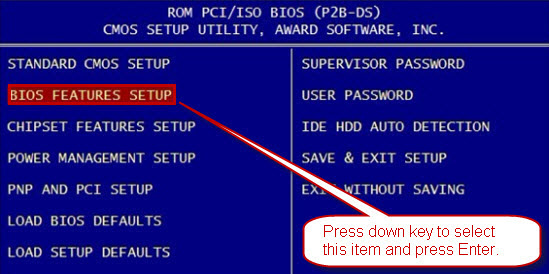
3. Press ↑/↓key to highlight Boot Sequence and hit Enter, choose A, CDROM, C for the Boot Sequence device. Then press F10 to save your setting and reboot your computer. Your computer will boot from your password recovery disk.

More examples: How to Set Computer Boot from CD/DVD-ROM via BOOT Menu or BIOS
I created a recovery disk with USB flash drive
Plug in your password recovery disk you have created with USB Flash Drive and set your computer to boot from USB. If your BIOS version is AMI, follow the procedures. It is easy and important.
1. Press F2/Delete (How to Enter Your BIOS SETUP via BIOS Key) as soon as you can while your PC reboots until the BIOS SETUP screen appears.
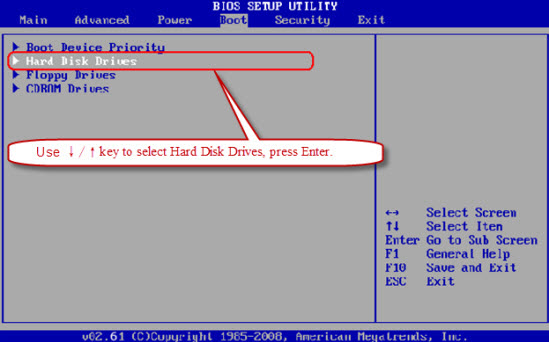
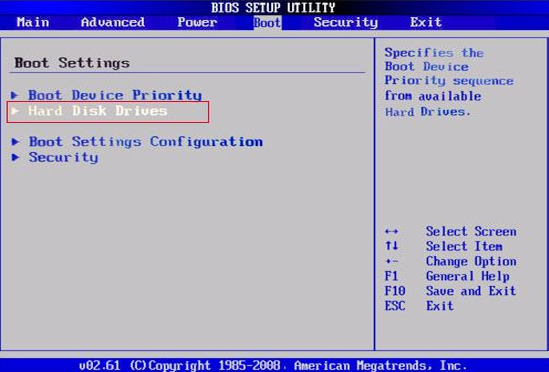
2. Looking for a tab relating to booting in the BIOS SETUP screen, it is called "Boot" in this example. You can use ←/→ key to select and open it. You'll see a submenu that's specific to the PC Drive boots sequence. Use ↓/↑key to highlight "Hard Disk Drives", hit "Enter".
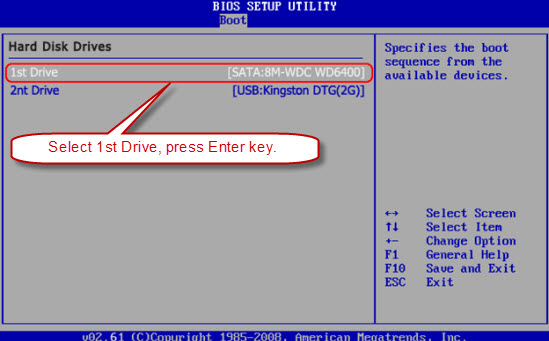
3. Use ↓/↑key to select "1st Drive", hit "Enter" key.
4. Go on enter Boot Settings, then the Boot Device Priority item.

5. Enter Hard Disk Drives.
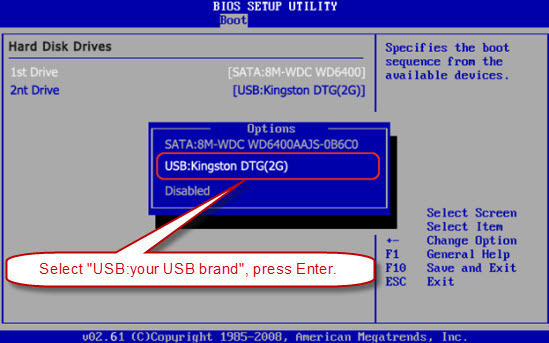
6. Select "USB: your USB brand", and press "Enter" key to set the USB Flash drive as the first bootable option.
7. Then you can see USB Flash Drive is the first boot device.
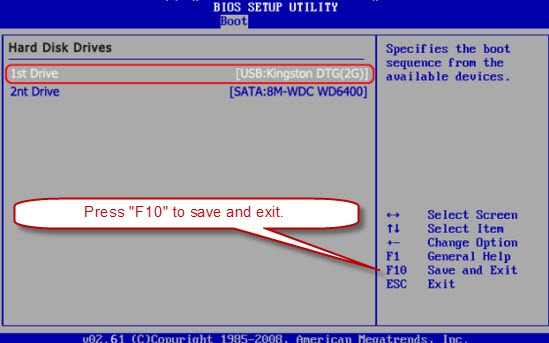
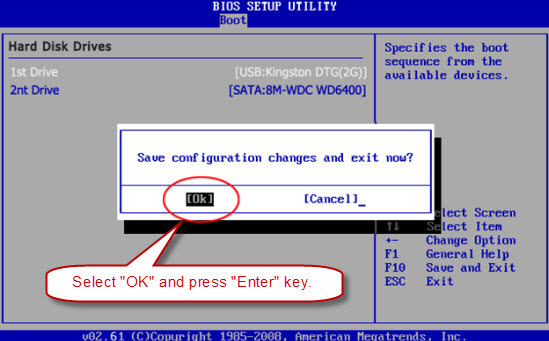
8. When you done the operations, press "F10" to save and exit. Select "OK" and press "Enter" key, then the computer will reboot and boot from USB Flash Drive(your password recovery disk).
More examples: How to Set Computer Boot from USB Flash Driver via BOOT Menu or BIOS
Step 4: Reset the password by a few cliks.
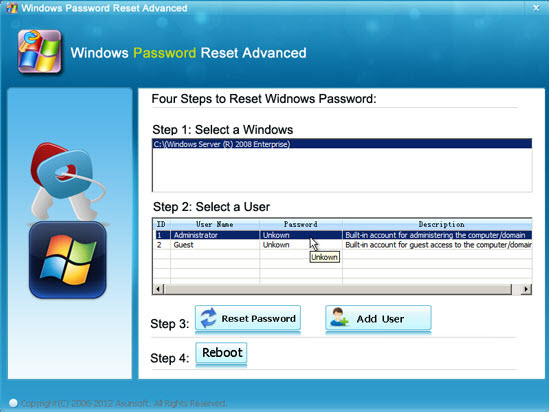
Now you can reset any user account password of your computer.
1. Select a Windows System from the list. All Windows system on your computer will be listed.
2. Click a user account from the user list. All user accounts of your Windows will be listed.
3. Click Reset Password button and click Yes when a confirm dialog pops up to reset user's password, then you can reset other users' password as well.
If your system is Windows 10/8/7/Vista/XP/2000, Windows Password Geeker Advanced will reset the password as blank, you can log on without password.
If your system is Windows Server 2012/2011/2008/2003/2000, the password will be reset as Asunsoft@2012, you can logon with this new password.
4. After resetting password successfully, click Reboot. When a cinfirm dialog pops up, eject password recovery disk, and click Yes to restart your computer then you can feel free to login your Windows with the new password.
Tips: "Windows Password Geeker Advanced" allows you to create new administrator account to Windows 10, 8, 7, Vista, XP, 2012, 2011, 2008, 2003, 2000 without loging. You can click Add User button to add a new user(Administrator) then you can login your locked computer with this new account. More informaton: How to Create a New User Offline When You Locked Out of Windows.