It was on the National Day holiday. When I was addicted into playing my Windows 7 computer, one of my best friends came and asked me to go for a ride. At that time, I was appreciating a pile of photos and was in a dilemma hesitating whether turn off my computer or not, if I turn off, I have to browse and find the photos I was viewing from the very beginning one by one; if I kept it on, it is a waste of power energy for a quite long time. Then my friend made a decision for me to enable the hibernation mode.
Hibernation mode is a mode adopted when it is not in use for a considerable period of time to cut down the computer’s power consumption. It saves all the opened files and programs to a file belonging to hard drive. In hibernation mode, even power failure will not affect the saved data and when you switch on your computer again, it works normally.
If you intend to enable hibernation, you should make sure that you have enough space in your computer. Because after you enable hibernation, it will generate a file named hibernate.sys located on your root system partition with a similar size of your physical memory. So if your system partition space is not enough and there is no need for you to enable hibernation mode, you’d better to disable hibernation mode to save disk space. Now let’s see how to disable hibernation mode in Windows 7 if you have enabled.
1. Click Start Menu, choose All Programs, then Accessories and last Command Prompt. You right click on the Command Prompt item and select Run as Administrator.
2. Type in the command like: “powercfg /hibernate off” and press Enter key.
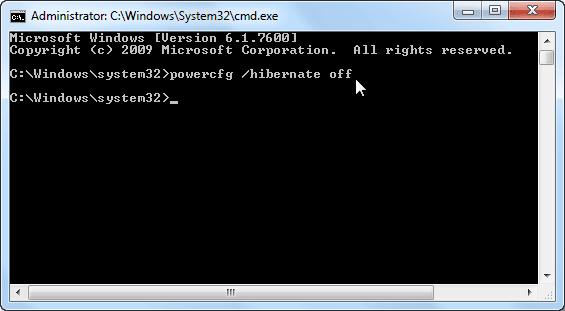
3. After you press Enter, it will disable the hibernate feature. You restart your computer, if there is still a hibernate.sys file in your system drive, you delete it. Then you have successfully disabled hibernation mode.
Related Articles: